Processing...

Please Wait.
  • Disha Diagnostic Centre

    +91-2162235580/23338

  • Nandadeep Pathology

    (02162) 239237/7219831971

  • Nirmay Hospital

    (02162) 299158/233181

  • Jeevanjyot Laboratory

    (02162) 233927


Information about Tests!

PRINCIPLE: In rare instances, a Barr body smear may be obtained from the upper inside cheek, a buccal smear, to determine if Barr bodies are present. A properly collected cheek scraping enables the cytology department to identify the presence of Barr bodies.

  • Barr body smear collection:
    • Obtain curette or a metal spatula/scraper.
    • Scrape upper inside cheek above the gum line with a curette.
    • Spread material onto a glass slide.
    • Spray fix the slide immediately; therefore, ensuring proper preservation.
  • Barr body smear submission:
    • Label slide with patient’s first and last name with pencil on the frosted end of the slide.
    • Place labeled slide into a slide container for shipment to Mercy Medical Center-North Iowa Laboratory.
    • Make certain that the requisition is completely answered and attached or placed in biohazard bag with specimen.

PRINCIPLE: To collect a breast specimen which will allow for cytologic preparation and evaluation at the Laboratory.

Collection of breast specimen:
  • Breast slides:
    • Label slides with patients’ first and last name with pencil on the frosted end of the slide.
    • Express specimen on slide (1 to 2 drops will most likely suffice).
    • Using another labeled slide, place slide on top of expressed drops and gently pull slides apart; therefore the result will be a thin layer of cells dispersed throughout the slide(s).
    • Fix immediately with spray fixative or by placing slides into 95% ethyl alcohol.
    • Submit slides to the Laboratory with the cytology requisition.
  • Breast fluid:
    • Obtain specimen.
      • Submission to the Laboratory:
      • Specimen may be delivered to the Laboratory without preservative if time frame from collection to delivery is less than 1 hour.
      • Specimen delivered to the Laboratory in preservative.
      • Mix specimen with equal volume of 70% ethyl alcohol or Shandon Cytospin Collection fluid.
      • Submit breast fluid to the Laboratory with cytology requisition.

PRINCIPLE: To collect a bronchial specimen which will allow for cytologic preparation and evaluation at the Laboratory. The most useful cytologic technique is usually direct brushings of a visible lesion.

  1. Collection of breast specimen:
    1. Breast slides:
      1. Label slides with patients’ first and last name with pencil on the frosted end of the slide.
      2. Express specimen on slide (1 to 2 drops will most likely suffice).
      3. Using another labeled slide, place slide on top of expressed drops and gently pull slides apart; therefore the result will be a thin layer of cells dispersed throughout the slide(s).
      4. Fix immediately with spray fixative or by placing slides into 95% ethyl alcohol.
      5. Submit slides to the Laboratory with the cytology requisition.
    2. Breast fluid:
      1. Obtain specimen.
      2. Submission to the Laboratory:
        1. Specimen may be delivered to the Laboratory without preservative if time frame from collection to delivery is less than 1 hour.
        2. Specimen delivered to the Laboratory in preservative.
          Mix specimen with equal volume of 70% ethyl alcohol or Shandon Cytospin Collection fluid.
        3. Submit breast fluid to the Laboratory with cytology requisition.

PRINCIPLE: To collect a bronchial specimen which will allow for cytologic preparation and evaluation at the Laboratory. The most useful cytologic technique is usually direct brushings of a visible lesion.

  1. Collection of a bronchial specimen:
    1. Bronchial brushings:
      1. Label slides with patient’s complete first and last name with pencil on the frosted end of the slide.
      2. Roll brush(es) across the slide.  Note:  Do not rub brush or crush material when preparing slides.
      3. Fix immediately with spray fixative or by placing slides into 95% ethyl alcohol.
      4. Submit slides to the Laboratory with the cytology requisition.
    2. Bronchial washings:
      1. Obtain specimen.
      2. Submission to the Laboratory:
        1. Specimen may be delivered directly to the Laboratory without preservative if time frame from collection to delivery is less than 1 hour.
        2. Specimen delivered to the Laboratory in preservative: 
          Mix specimen with equal volumes of 70% ethyl alcohol or Shandon Cytospin Collection fluid.
        3. Label container with patient’s first and last name and site of washing source.
      3. Submit washings to the Laboratory with cytology requisition.
    3. Bronchial brush:
      1. Obtain specimen.
      2. Submission to Laboratory:
        1. Specimen brush must be delivered to the Laboratory in preservative.
        2. Place brush into Shandon Cytospin Collection fluid or into saline until brush is completely submerged in the fluid.
        3. Label container with patient’s first and last name and site of brush source.
      3.   Submit specimen to the Laboratory with cytology requisition.
      4. Submission of brush along with slides and washings is not mandatory.


PRINCIPLE:To collect a bronchoalveolar lavage (BAL) specimen which will allow for cytologic preparation and evaluation at the Laboratory.
PURPOSE: Commonly a bronchoalveolar lavage specimen is collected to identify organisms such as Pneumocystis carinii, and bacterial, viral, or fungal agents causing pulmonary infections.

  1. Collection of a bronchoalveolar lavage specimen:
    1. Purpose of a BAL specimen.
      1. BAL specimens were initially introduced as a therapeutic procedure for removal of the alveolar spaces of accumulated secretions for cases of alveolar proteinosis and bronchial asthma.  Subsequently, it has been used for cases of sarcoidosis and pulmonary fibrosis.  Most recently it has been used for the identification of organisms such as Pneumocystis carinii and bacterial and viral agents causing pulmonary infections in individuals afflicted with the acquired immunodeficiency syndrome (AIDS).
      2. Obtaining specimen
        1. Perform procedure under local anesthesia.
        2. Pass a bronchoscope to the lung segment of interest, usually a secondary or tertiary bronchus, and wedged to occlude the bronchial lumen.
        3. From 100-300 ml of saline are instilled in 20-50 ml aliquots and reaspirated. 
        4. The collected fluid is forwarded to the Laboratory for further processing.
    2. Submission to the Laboratory:
      1. Specimen may be delivered directly to the Laboratory without preservative if time frame from collection to delivery is minimal.  It is preferred that the specimen be delivered in a timely manner without preservative.
      2. Specimen delivered to the Laboratory in preservative.
        Mix specimen with equal volumes of 70% ethyl alcohol or Shandon Cytospin Collection fluid.
      3. Please label container with patient’s first and last name and type of specimen.
    3. Submit specimen to the Laboratory with corresponding cytology requisition.

PRINCIPLE: To collect a cerebrospinal fluid (CSF) which will allow for cytologic preparation and evaluation at the Laboratory. CSF may be a lumbar puncture fluid from central canal of spinal cord, fluid from the ventricles of the brain, or occasionally from a shunt inserted to relieve hydrocephalus.

  1. Collection of cerebrospinal fluid:
    1. Obtain specimen.
    2. Specimen submission to Laboratory:
      1. Fix specimen with equal volume of 70% ethyl alcohol or Shandon Cytospin Collection fluid.
      2. Due to rapid cell loss, fixative should be mixed with specimen immediately after completion of procedure.  Place in refrigerator until shipment or delivery to Laboratory.
      3. If spinal fluid collected at Mercy Medical Center-North Iowa, transport specimen to Laboratory immediately for processing.  Addition of fixative is optional.
      4. Label specimen container with patient’s first and last name and site of specimen.
      5. Submit specimen with cytology requisition.

PRINCIPLE: To collect a gastrointestinal specimen which will allow for cytologic preparation and evaluation at the Laboratory. The most useful cytologic technique is usually direct brushings of a visible lesion.

  1. Collection of a gastrointestinal specimen:
    1. Gastrointestinal brushings:
      1. Label slides with patient’s complete first and last name with pencil on the frosted end of the slide.
      2. Roll brush(es) across the slide.  Note: Do not rub brush or crush material when preparing slides.
      3. Fix immediately with spray fixative or by placing slides into 95% ethyl alcohol.
      4. Submit slides to the Laboratory with the cytology requisition.
    2. Gastrointestinal washings:
      1. Obtain specimen.
      2. Submission to the Laboratory:
        1. Specimen may be delivered directly to the Laboratory without preservative if time frame from collection to delivery is less than 1 hour.
        2. Specimen delivered to the Laboratory in preservative:
          Mix specimen with equal volumes of 70% ethyl alcohol or Shandon Cytospin Collection fluid.
        3. Label container with patient’s first and last name and site of washing source.
      3. Submit washings to the Laboratory with cytology requisition.
    3. Gastrointestinal brush:
      1. Obtain specimen.
      2. Submission to Laboratory:
        1. Specimen brush must be delivered to the Laboratory in preservative.
        2. Place brush into Shandon Cytospin Collection fluid or into saline until brush is completely submerged in the fluid.
        3. Label container with patient’s first and last name and site of brush source.
      3. Submit specimen to the Laboratory with cytology requisition

PRINCIPLE: To collect an ovarian cyst specimen which will allow for cytologic processing and evaluation.

  1. Collection of an ovarian cyst specimen:
    1. Obtain specimen.
    2. Specimen submission to the Laboratory:
      1. Fix specimen with equal volume of 70% ethyl alcohol or Shandon Cytospin Collection fluid.
      2. If specimen collected in large 200 ml glass jar, preservative need not be added.  For best results, keep specimen refrigerated until shipment or delivery to Laboratory.  Deliver within 1 hour of collection.
      3. If ovarian cyst fluid is collected at Mercy Medical Center-North Iowa, transport specimen to Laboratory  immediately for processing.  Addition of fixative is optional.   If extended delay occurs, please add fixative  to specimen and refrigerate.
      4. Label specimen container with patient’s first and last name and with source of specimen.
      5. Submit specimen with cytology requisition.

PRINCIPLE: To collect a pericardial specimen which will allow for cytologic processing and evaluation. Effusions may result from a variety of causes: collagen vascular disease, circulatory disorders, neoplasms, and infections.

  1. Collection of a pericardial specimen:
    1. Obtain specimen.
    2. Specimen submission to the Laboratory:
      1. Fix specimen with equal volume of 70% ethyl alcohol or Shandon Cytospin Collection fluid.
      2. If specimen collected in large 200 ml glass jar, preservative need not be added.  For best results, keep specimen refrigerated until shipment or delivery to Laboratory.
      3. If pericardial effusion is collected at Mercy Medical Center-North Iowa, transport specimen to Laboratory immediately for processing.  Addition of fixative is optional.   If extended delay occurs, please add fixative to specimen and refrigerate.
      4. Label specimen container with patient’s first and last name and with source of specimen.
      5. Submit specimen with cytology requisition

PRINCIPLE: To collect a peritoneal specimen which will allow for cytologic processing and evaluation. Effusions may result from a variety of causes: collagen vascular disease, circulatory disorders, neoplasms, and infections.

  1. Collection of a peritoneal specimen:
    1. Obtain specimen.
    2. Specimen submission to the Laboratory:
      1. Fix specimen with equal volume of 70% ethyl alcohol or Shandon Cytospin Collection fluid.
      2. If specimen collected in large 200 ml glass jar, preservative need not be added.  For best results, keep  specimen refrigerated until shipment or delivery to Laboratory.
      3. If peritoneal effusion is collected at Mercy Medical Center-North Iowa, transport specimen to Laboratory immediately for processing.  Addition of fixative is optional.   If extended delay occurs,  add fixative (equal volume fixative/specimen) to specimen and refrigerate.
      4. Label specimen container with patient’s first and last name and with source of specimen.
      5. Submit specimen with cytology requisition.

PRINCIPLE: To collect a pleural specimen which will allow for cytologic processing and evaluation. Effusions may result from a variety of causes: collagen vascular disease, circulatory disorders, neoplasms, and infections.

  1. Collection of a pleural specimen:
    1. Obtain specimen.
    2. Specimen submission to the Laboratory:
      1. Fix specimen with equal volume of 70% ethyl alcohol or Shandon Cytospin Collection fluid.
      2. If specimen collected in large 200 ml glass jar, preservative need not be added.  For best results, keep  specimen refrigerated until shipment or delivery to Laboratory.
      3. If pleural effusion is collected at Mercy Medical Center-North Iowa, transport specimen to Laboratory   immediately for processing.  Addition of fixative is optional.   If extended delay occurs, please add fixative to specimen and refrigerate.
      4. Label specimen container with patient ’s first and last name and with source of specimen.
      5. Submit specimen with cytology requisition.

PRINCIPLE: To collect a sputum specimen which will allow for cytologic preparation and evaluation at the Laboratory. Sputum cytology can be easily obtained and may be useful in the detection of cancer of the respiratory system.

  1. Sputum collection:
    1. An early morning deep cough specimen prior to any food or water ingestion is the best type of sputum sampling.  Sputum contaminated by food and drink can hinder obtaining diagnostic cells or even make the sputum unsatisfactory for evaluation.
    2. Prior to collection, have patient rinse mouth with plain water.
    3. Have patient proceed to cough up specimen into a collection container.
    4. Fix obtained sputum with at least 10 ml of 70% ethyl alcohol or Shandon Cytospin Collection fluid.  If specimen volume is greater than 10 ml, mix obtained sputum with an equal volume of fixative.
    5. If specimen collected at Mercy Medical Center-North Iowa, transport specimen to Laboratory immediately.  Addition of fixative is optional.  If substantial delay will occur in submission to Lab, add fixative as described above.
    6. For optimal diagnostic evaluation, it is recommended that three sputum specimens be collected on three consecutive mornings.   Do not pool specimens.
    7. Submit specimen with cytology requisition.

PRINCIPLE: To collect a synovial specimen which will allow for cytologic processing and evaluation.

  1. Collection of a synovial specimen:
    1. Obtain specimen.
    2. Specimen submission to the Laboratory:
      1. Fix specimen with equal volume of 70% ethyl alcohol or Shandon Cytospin Collection fluid.
      2. If specimen collected in large 200 ml glass jar, preservative need not be added.  For best results, keep  specimen refrigerated until shipment or delivery to Laboratory.
      3. If synovial fluid is collected at Mercy Medical Center-North Iowa, transport specimen to Laboratory  immediately for processing.  Addition of fixative is optional.   If extended delay occurs,  add fixative to specimen and refrigerate.
      4. Label specimen container with patient’s first and last name and with source of specimen.
      5. Submit specimen with cytology requisition.

PRINCIPLE: To collect a thyroid specimen which will allow for cytologic preparation and evaluation at the Laboratory.

  1. Collection of thyroid specimen:
    1. Thyroid slides:
      1. Label slides in pencil on frosted end with patient’s first and last name.
      2. Express specimen on slide (1 to 2 drops will most likely suffice).
      3. Using another labeled slide, place slide on top of expressed drops and gently pull slides apart; therefore the result will be a thin layer of cells dispersed throughout the slide(s).
      4. Fix immediately with spray fixative or by placing slides into 95% ethyl alcohol.
      5. Submit slides to the Laboratory with the cytology requisition.
    2. Thyroid fluid:
      1. Obtain specimen.
      2. Submission to the Laboratory:
        1. Specimen may be delivered to the Laboratory without preservative if time frame from collection to delivery is less than 1 hour.
        2. Specimen delivered to the Laboratory in preservative.
          Mix specimen with equal volume of 70% ethyl alcohol or Shandon Cytospin Collection fluid.
        3. Submit thyroid fluid to the Laboratory with cytology requisition.

PRINCIPLE: In rare instances, a Tzanck smear may be obtained from the skin to determine or aid in the detection of a viral organism that may be present. A properly collected skin scraping or Tzanck smear enables the cytology department to make such a diagnosis.

  1. Tzanck smear collection:
    1. Remove crust or dome of lesion.
    2. Scrape ulceration with a curette.
    3. Spread material onto a glass slide.
    4. Spray fix the slide immediately; therefore, ensuring proper preservation.
  2. Tzanck smear submission:
    1. Label slide in pencil on the frosted end with patient’s first and last name.
    2. Place labeled slide into a slide container for shipment to Mercy Medical Center-North Iowa Laboratory.
    3. Make sure that requisition is completely answered and attached or placed in biohazard bag with specimen.

PRINCIPLE: To collect a urine specimen which will allow for cytologic preparation and evaluation at the Laboratory. Urine cytology is primarily useful in diagnosing diseases that involve the bladder and the collecting tubes that are associated with the bladder.

  1. Collection of urine specimen:
    1. Obtain specimen.  For best results, do not use the first voided urine of the morning.  A random midstream "clean catch" voided urine is most preferred.  Due to cell deterioration, fixative must be added immediately to ensure specimen preservation.
    2. Specimen submission to the Laboratory:
      1. Fix specimen with equal volume of a 50% ethyl alcohol or Shandon Cytospin Collection fluid.
      2. Due to the possibility of cell loss, fixative should be mixed with specimen immediately after completion of procedure.  Place in refrigerator until shipment or delivery to Laboratory.
      3. If urine specimen collected at Mercy Medical Center-North Iowa, transport specimen to the Laboratory immediately for processing.  Addition of fixative is optional.  If there will be a delay of more than 1 hour in delivery of specimen to Lab, add fixative to specimen and refrigerate.
      4. Label collection container with patient’s first and last name as well as source of specimen.
      5. Submit specimen with cytology requisition.

PRINCIPLE: To ensure proper specimen ordering when collecting a pap smear.

  1. The clients receive the following supplies from the Mercy Medical Center-North Iowa Laboratory. 
    1. ThinPrep vials
    2. Spatulas
    3. Brushes
    4. Conventional pap packs
    5. Spray Fixative

    Supplies are available by phone call (x7561) or written request.

  2. The cytology requisition information must be answered on the following:
    1. Date of collection
    2. Physician
    3. Source and site of specimen
    4. Patient name (last and first)
    5. Relevant billing information
    6. Age and date of birth
    7. Physician assistant/nurse practitioner (if applicable)
    8. Patient sex
    9. Any prior cytology or histology information (example: previous pap results, history of biopsies, etc.)
    10. Relevant clinical history ( example: leep procedure, cryotherapy, laser, etc.)
    11. Summary of clinical symptoms if applicable (example: post menopausal bleeding, vaginal discharge, etc.)
    12. Date of last menstrual period
    13. Hormone therapy
    14. Indication of specific patient conditions such as post partum, post menopausal, or pregnant
    15. Birth control or contraceptive use

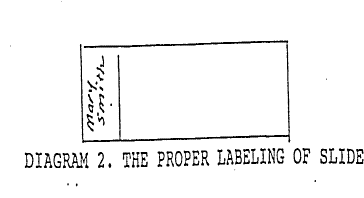
1. Each slide must be labeled in pencil with patient name. Name on slide and slip must match in order to prevent rejection of specimen at the Cytology Laboratory. Slide must be labeled with complete first and last name spelling. No abbreviations will be accepted (see diagram 2). Data on the cytology requisition must be answered completely and accurately.

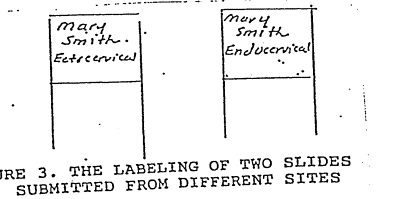
1.In some instances, two slides are submitted on a patient for evaluation. Each slide must be labeled in pencil with patient name and a separate distinction on the slide must be made as to site of each slide. For example, endocervical and ectocervical (see figure 3) write name and site distinction on frosted end of site.

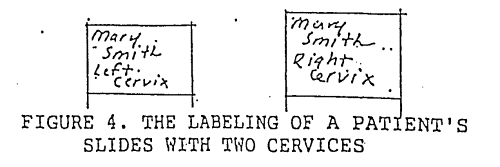
1.In rare instances, a patient will have two cervices. A pap smear should be performed on both cervices. Slides must be labeled in pencil with patient name and a distinction as to left or right must be made (see figure 4). Write name and site distinction on frosted end of slide.


PRINCIPLE: To ensure that a pap smear is properly collected at the doctor’s office.
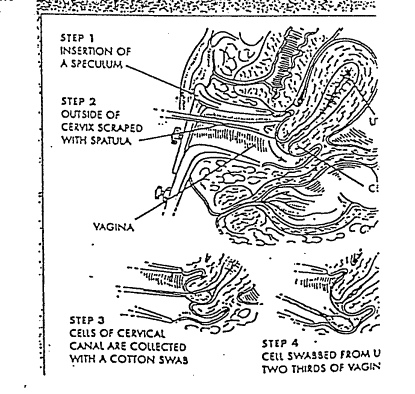
  1. The doctor will insert a tool called a speculum into the vagina using water as a lubricant if necessary.  K-Y Jelly and other commercial lubricants can obscure the cells in the sample.  If there is a large amount of discharge on the cervix, the doctor will gently wipe it off.
  2. The next step is to scrape the outside of the cervix carefully with the spatula, rotating it 360 degrees to ensure a sample of the entire area.  This sample is smeared on a glass slide in as thin a layer as possible, then quickly fixed by spraying or immersing it in a fixative.  This preserves the cells in the state, which they were found and prevents drying.
  3. Next, the endocervical canal is sampled with a Q-tip or cytobrush, again rotating the tool 360 degrees to sample the entire canal.  This sample is smeared on the same or a new slide, and fixed.

Method B:

  1. Using a pencil, write the patient’s name on the frosted end.
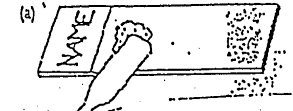
  2. Place the vaginal pool mucus on the slide near the frosted end.  Do not smear.   (See figure A)
     Slide 2
  3. Scrape the cervix with the spatula provided.  Do not smear.
  4. Insert the cytobrush into the endocervical canal until the bristles are barely visible.  Turn 90 degrees to 180 degrees and remove.
  5. Now in rapid succession:
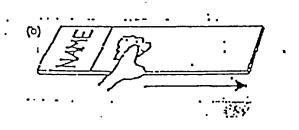
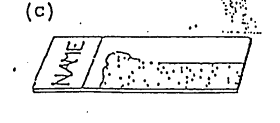
    1. Mix half of the vaginal pool mucus with the spatula specimen and smear along the entire length of the slide using only half of the surface. (See figure B and C).
          Slide step 5Slide step 5 part b
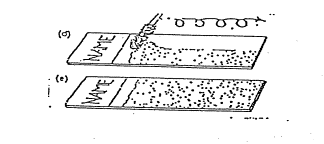
  6. Mix the remaining half of the vaginal pool mucus with the brush specimen and smear by rolling the brush along the entire length of the slide using the remaining half of the slide surface.  Bending the bristles will help transfer the cells to the slides.      (See figure D and E).
     
  7. Apply spray fixative immediately.  If smears are allowed to air dry before fixation, marked distortion of cells occurs which can extremely hinder sample interpretation.

Method C:

  1. Using a pencil label the frosted end of the slide with the patient’s name.
  2. Scrape the mid-lateral wall of the vagina very lightly with a spatula and keep the sample on the spatula.
  3. Scrape the entire ectocervix with another spatula and keep this sample on the spatula.
  4. Introduce an extended tip spatula or endocervical brush device into the endocervix.
    Rotate the brush 90 to 180 degrees.  (A brush is not recommended in pregnancy, cervical stenosis, or other clinical circumstances indicated by the manufacturer).
  5. Then, and only then, smear the endocervical specimen on the section of the slide farthest from the frosted end, and in quick succession spread the cervical sample in the middle section of the slide and vaginal specimen on the section closest to the frosted end.
  6. Fix the smear immediately after spreading all three sections by spray fixing with fixative.  If smears are allowed to air dry before fixation, marked distortion of cells occurs which can extremely hinder sample interpretation.

Method D (the Maturation Index):

  1. A maturation index may be ordered on a submitted pap smear. 
  2. The specimen should be obtained from the lateral vaginal wall for optimum reliability.
  3. The specimen should be smeared in the same manner as a normal pap smear and spray fixed immediately to ensure proper fixation.

PRINCIPLE: To ensure proper specimen labeling when collecting a pap smear.

  1. Each vial must be labeled in pencil, pen, or sticker with patient name.  Name on vial and slip mush match in order to prevent rejection of specimen at the cytology laboratory.  Vial must be labeled with complete first and last name spelling.  No abbreviations will be accepted.  Data on cytology requisition must be answered completely and accurately.
  2. Some instances, two vials are submitted on a patient for evaluation.  Each vial must be labeled with patient name and a separate distinction on the vial must e make as to site of each vial. For example, endocervical and ectocervical.
  3. In rare instance, a patient will have two cervices.  A pap smear should be performed on both cervices.  Vials must be labeled patient name and a distinction as to left or right must be made.

PRINCIPLE: To ensure that a ThinPrep pap smear has been collected properly; therefore, the preparation of the specimen will allow for best staining and interpretative results.
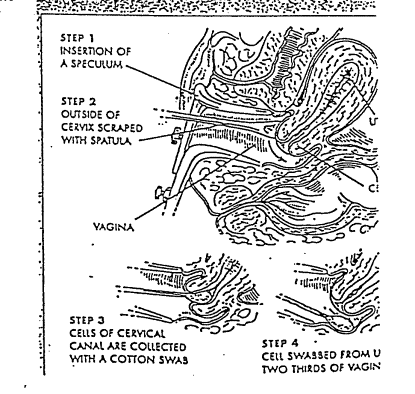
  1. The doctor will insert a tool called a speculum into the vagina using water as a lubricant if necessary.  K-Y Jelly and other commercial lubricants can obscure the cells in the sample.  If there is a large amount of discharge on the cervix, the doctor will gently wipe it off.
    • If a plastic spatula and endocervical brush are the devices of choice by the physician proceed to step #2.
    • If a cervical cytology broom is the device of choice by the physician proceed to step #5.
  2. The next step is to scrape the outside of the cervix carefully with the spatula, rotating it 360 degrees to ensure a sample of the entire area.  This sample on the spatula is rinsed as quickly as possible into the PreservCyt solution vial by swirling the spatula vigorously in the vial 10 times.  Discard spatula.
  3. Next, the endocervical canal is sampled by use of an endocervical brush device.  Insert the bristles of the device into the cervix until only the bottom most fibers are exposed.  Slowly rotate endocervical brush ¼ or ½ turn in one direction.  Do not over rotate.
  4. Obtain the same vial that was used to rinse the spatula, now rinse the brush or broom as quickly as possible in the PreservCyt Solution by rotating the device in the solution 10 times while pushing against the PreservCyt vial wall.  Swirl the brush vigorously to further release material.  Discard the brush.  Proceed to step #8

    Thin prep

  5. Contact the cervix with broom and insert the central bristles into the cervical canal deep enough to allow the shorter bristles to fully contact the ectocervix.
  6. While maintaining gentle pressure in the direction of the cervix, rotate the broom 5 times in a clockwise direction.
  7. Rinse the broom into the PreservCyt Solution by pushing the brush into the bottom of the vial 10 times, forcing the bristles apart.  Swirl the broom vigorously to further release material.  Discard the collection device.
  8. Grab vial and secure cap. (Note: Tighten cap so that the torque line on the cap passes the torque line on the vial.
  9. Record the patient’s name on the vial and record the patient information and medical history on the cytology requisition.
  10. Place vial and requisition in a specimen bag for transport to the laboratory